Secure Cold Wallet Setup
Last updated for CLI release v1.7.2.
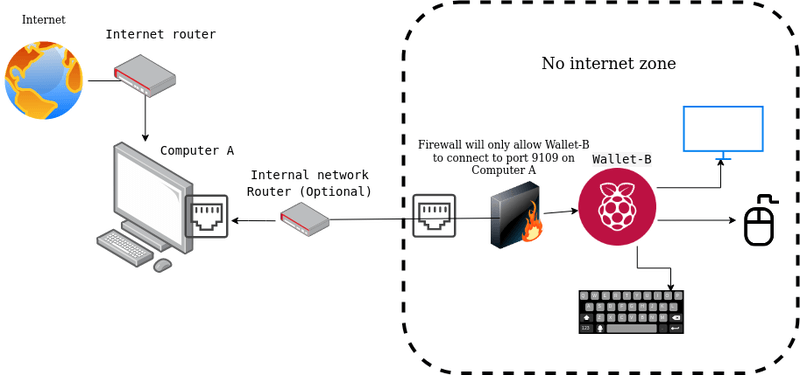
This is a guide for securely holding your ExchangeCoin. The system described here uses two computers:
-
Computer-A- The NodeA laptop or desktop that will be running the exccd node. Connects to the public internet and is expected to remain online most of the time.
-
Wallet-B- The WalletA secure system that will be running the wallet. Should never connect to the public internet and can remain offline and powered off most of the time.
The guide assumes some general technical knowledge, and that users know how to enter commands on a terminal. This guide uses the more technical CLI-based ExchangeCoin software, but it would be possible to use a GUI for Wallet B and still maintain similar security.
Although focused on ExchangeCoin and Raspberry Pi, this guide can also be used for more general hardware devices and almost any cryptocurrency. This guide also gives instructions and commands specific to Debian/Linux systems, but the principles/tools can be applied to almost any OS.
Because firewalls can be complex and difficult for beginners, this guide assumes that users have zero familiarity with firewalls. The instructions here will explain how to set up a simple (but strong and sufficient) software firewall that isolates Wallet-B from the public internet.
Scope and Limitations
The scope of this guide is to secure your cryptocurrency holdings from common malware and light threats. The wallet setup in this guide is generally known as a “cold wallet.” If you are a normal cryptocurrency holder and follow this guide exactly, it should provide a good level of security.
This setup will not protect you against a state-level attacker or a persistent threat.
General Security offers more techniques to keep your system secure.
The Setup
Benefits of this Setup
Wallet-Bis kept offline and turned off most of the time. This greatly reduces the attack surface/opportunity.- An attacker would have to compromise exccd on
Computer-Afirst, and then find a way to break intoWallet-Busing the RPC to compromise and steal your wallet data. This is highly unlikely and difficult to pull off. This is highly unlikely and difficult to pull off. - exccd on
Computer-Acan be used for other purposes in your local network (e.g., other wallets, DEX, etc.), so you don’t need to maintain multiple exccd instances within your local network. - Even though
Wallet-Bis kept offline, it’s still possible for it to participate in staking by using a VSP. - Advanced readers can extrapolate from this guide and make
Wallet-Ba “hot” wallet so they can Solo Stake, but that’s significantly more vulnerable to attacks and outside the scope of this guide.
Hardware
Computer-A - The Node
In general, you can use almost any computer to run the node (see the Minimum Recommended Specifications for exccd).
Computer-A is expected to remain online most of the time, but it’s not required. For a budget device with a low energy requirement, it’s fine to use a Raspberry Pi, but keep in mind that your device also needs to run an operating system. Many people choose to run nodes on the 4 GB models of Raspberry Pi’s, using a lightweight OS. It would also be fine to use an old laptop or desktop. This guide assumes users are aware that since Computer-A is connecting to the public internet, it is potentially vulnerable to attacks.
Wallet-B - The Wallet
Since the wallet needs to have the utmost security in this setup, it’s important to have a minimal attack surface. This guide suggests that this wallet be a cold wallet, i.e. powered off most of the time. It is nearly impossible to attack a system which is powered off. This guide suggests using a Raspberry Pi for the wallet, although other hardware can be used.
Finally, this guide suggests using a mouse, keyboard, and monitor to access each device.
This will allow you to directly interact with the devices and ensure a secure connection without relying on remote access tools that could potentially be compromised. By physically connecting to your devices, you can further reduce the attack surface and minimize the risk of unauthorized access.
Operating Systems
Since Computer-A is not storing any sensitive information, the choice of operating system is less important than the choice for Wallet-B. exccd can be installed on anything from Windows to Mac to Linux to OpenBSD. However, using Linux or OpenBSD should be considered to reduce your attack surface.
This guide assumes you already have an operating system on Computer-A, and won’t describe how to install a new one.
Wallet-B will be the more secure device. Use an operating system you feel comfortable with. Consider using Linux or OpenBSD to reduce your attack surface. Raspbian works fine if you want a GUI, and Ubuntu Desktop is another good choice for beginners who don’t need a GUI.
This guide will give commands specific to Debian/Linux based systems. All details/commands that come within curly braces {} cannot be copy-pasted - you will need to remove the curly braces and edit the command to suit your setup.
Setting up Computer-A
If you use exccwallet on this system, do not use the same seed and/or password on Wallet-B
-
Use exccinstall to install ExchangeCoin binaries and config files.
-
Use
ifconfigto find the IP address ofComputer-Aon your local network. -
Start exccd on
Computer-A, ensuring it exposes RPC to the local network.exccd --rpclisten={LOCAL_IP_OF_COMPUTER-A}Let exccd fully sync to the latest block.
-
Create a folder which will be copied over to
Wallet-B. Copy the exccd certificate and config into that folder.mkdir ~/copytob cp ~/.exccd/rpc.cert ~/copytob cp ~/.exccd/exccd.conf ~/copytob -
Download the ExchangeCoin binaries release for your
Wallet-BOS from GitHub and place it in the same folder.Note: it’s recommended that you don’t use
exccinstallagain onWallet-B, since it would generate new*.certand*.conffiles which are not compatible withComputer-A.wget -P ~/copytob https://github.com/EXCCoin/excc-binaries/releases/download/v1.7.2/excc-linux-arm64-v1.7.2.tar.gz wget -P ~/copytob https://github.com/EXCCoin/excc-binaries/releases/download/v1.7.2/excc-v1.7.2-manifest.txt wget -P ~/copytob https://github.com/EXCCoin/excc-binaries/releases/download/v1.7.2/excc-v1.7.2-manifest.txt.asc -
Using the binary tar file, manifest, and signature you just downloaded, verify the tar file to ensure it has not been tampered with. Once verified, you can delete the manifest and signature files.
-
Archive the
copytobfolder for transport toWallet-B.tar -zcvf ~/copytob.tar.gz -C ~/copytob excc-linux-{arm/amd}64-v1.7.2.tar.gz exccd.conf rpc.cert` -
You can also calculate the hash to ensure that the file is not modified while moving.
sha256sum ~/copytob.tar.gz`Making a note of the generated hash is an important step in securing your wallet. The hash can be used as a reference to ensure that your wallet data hasn’t been tampered with or compromised. To store the hash securely, follow these suggestions:
Write down the hash on a piece of paper and store it in a secure location, such as a safe deposit box or a locked drawer. Take a photograph of the hash written on paper and store the photo in a secure location, either physically or digitally. If stored digitally, ensure it is encrypted and stored on a device not connected to the internet. Avoid storing the hash on any device that is connected to the internet, as it could be vulnerable to hacking or manipulation by malicious software.
By storing the hash securely and separately from your wallet data, you can later verify the integrity of your wallet by comparing the stored hash with a freshly generated hash from your wallet data. If the hashes match, you can be confident that your wallet data has not been tampered with or compromised.
-
Finally, copy the archive
copytob.tar.gzonto a portable drive, like a USB flash drive.For ease of use, make a folder on your portable drive called
bconfig, and then copy the archive over, e.g.:sudo mkdir /media/{your_username}/writable/bconfigthen
sudo cp ~/copytob.tar.gz /media{your_username}/writable/bconfigNow unmount the drive from your system.
This will be the last time you will ever connect this drive to a system with public internet access.
Setting up Wallet-B
-
Choose the operating system you’d like to use on
Wallet-B, then use another computer to make a bootable USB drive to install that OS.Generally speaking, an operating system with fewer features will have a smaller attack surface, so consider using a minimal OS with no unnecessary features.
If you are using a Raspberry Pi, you can use rpi-imager (details provided below).
To install Linux on non-Raspberry Pi systems, consider using unetbootin.
rpi-imager (click to expand)
https://www.raspberrypi.org/software/ has rpi-imager which has a nice easy to use interface and has Ubuntu Desktop listed under
Other general purpose OS->Ubuntu->Ubuntu Desktop.Once rpi-imager is done, the disk/card with the OS installed should mount volumes.
We will need to work with
writable
*boot
Open the
config.txtfile in*boot.Find the text
[all]and add the following lines below it:dtoverlay=disable-wifi dtoverlay=disable-btThis will disable the WiFi and Bluetooth from being initialized when the system boots.
-
Now boot
Wallet-Bwith the installation disk inserted, but MAKE SURE IT DOES NOT HAVE THE ETHERNET CABLE CONNECTED.Depending on the OS it should show you a system setup and a default user creation menu, proceed with a strong password. Once the system is installed it should reboot.
-
Once you have logged in, get familiar with the system, adjust the clock, etc.
-
Open a terminal and disable WiFi and Bluetooth using rfkill:
sudo rfkill block wifi
sudo rfkill block bluetooth
Raspberry Pi specific (click to expand)
Optionally you may choose to disable WiFi and Bluetooth at the kernel level too.
Create a file in
/etc/modprobe.d/raspi-blacklist.confand add the contents:blacklist brcmfmac blacklist brcmutil blacklist hci_uart blacklist btbcm blacklist btintel blacklist rfcom blacklist btqca blacklist btsdio blacklist bluetooth -
Set up the software firewall.
This is the key to keeping this device isolated from the public internet. If you ever connect to the internet from this device without this firewall active then this device could become vulnerable.
The simple firewall is as follows (and these steps have to be done in order):
- Deny all outgoing traffic attempting to leave this device.
- Deny all incoming traffic attempting to access this device.
- Allow outgoing traffic to
Computer-Aonly, on one specific port only (9666). - Enable the firewall.
sudo ufw default deny outgoing
sudo ufw default deny incoming
sudo ufw allow out to {LOCAL_IP_OF_COMPUTER-A} port 9666
sudo ufw enable
Replace
{LOCAL_IP_OF_COMPUTER-A}with the actual IP address ofComputer-A.You can check that the firewall is running using the command
sudo ufw status verbose. -
Now you may connect the ethernet cable.
Wait for the connection to take place and then test if you can connect to
Computer-Aon port 9666:wget {LOCAL_IP_OF_COMPUTER-A}:9666You should get an error a 400 Bad Request error. This is fine and shows that a connection is possible.
-
Now to set up exccctl and exccwallet. Insert the USB drive from
Computer-A.Before extracting this tarfile and running the binary, check that the file is unchanged.
sha256sum /bconfig/copytob.tar.gzIf the hash matches the hash you stored during the
Computer-Asetup, then you can extract the file.mkdir ~/exccconfigs mkdir ~/excc tar -xf /bconfig/copytob.tar.gz -C ~/exccconfigs tar -xf ~/exccconfigs/excc-linux-{amd/arm}64-v1.7.2.tar.gz -C ~/excc cp ~/excc/excc-linux-{amd/arm}64-v1.7.2/* ~/excc/ rm -rf ~/excc/excc-linux-{amd/arm}64-v1.7.2/Now we have the ExchangeCoin binaries in the
~/exccfolder. Don’t run them before creating the config files in the next step. -
The next step is to create the exccctl and exccwallet config files that will allow those processes to connect to
Computer-A.Create the directories for those files:
mkdir ~/.exccwallet/
mkdir ~/.exccctl/
Copy the RPC username and password from
~/exccconfigs/exccd.conf. These need to be pasted into the exccctl and exccwallet config files.Create the config files with the following contents:
~/.exccwallet/exccwallet.confrpcconnect={LOCAL_IP_OF_COMPUTER-A}:9666 cafile=~/exccconfigs/rpc.cert username={username} password={password}~/.exccctl/exccctl.confrpcserver={LOCAL_IP_OF_COMPUTER-A}:9666 walletrpcserver=127.0.0.1 rpccert=~/exccconfigs/rpc.cert rpcuser={username} rpcpass={password}
That’s it.
You can test your setup by running ~/excc/exccctl getbestblock.
It should show the latest block.
You can now setup a wallet as described in the exccwallet setup guide.
Improvements
- This system can only be used to store and spend coins.
It currently cannot be used to purchase tickets.
This can be easily achieved by hosting a TOR instance in
Computer-Aapt-get install torand then connecting exccwallet using its proxy setting. (You will need to add a rule to UFW accordingly eg:sudo ufw allow out to {LOCAL_IP_OF_COMPUTER-A} port 9050) - A MITM proxy can be setup between
Computer-ARPC andWallet-B. This can either be used to log traffic or can even be used to approve/disapprove all responses/requests. - Remove WiFi/Bluetooth hardware physically.
- Use a more secure/lightweight OS.
- Setup router level firewall rules secondary to UFW.
- Use an Ethernet crossover cable to connect to
Computer-A. This will greatly reduce the local network attack surface. (Most devices now auto cross over and you don’t need a special cable) - If your router supports it, bind the MAC of both devices to a static IP.
Common Errors and Pitfalls
Missing Software
Some operating systems might not have ufw or tar by default.
If your Wallet-B is missing some software, you will have to either copy it
from Computer-A using a removable storage device, or install it from an online
software repository.
IP Changes
If at any point the IP of Computer-A changes, the firewall rule on Wallet-B
which allows connections out to exccd on Computer-A will need to be recreated:
-
Find the existing firewall rule.
sudo ufw status numbered -
Delete the rule.
sudo ufw delete {RULE_NUMBER} -
Recreate the rule with the new IP.
sudo ufw allow out to {LOCAL_IP_OF_COMPUTER-A} port 9666
You will also have to regenerate certificates for exccd and copy them over securely.